In this closing article in this series on book assembly, the covers (cases) and book blocks discussed in the previous articles are brought together in the process called casing-in. In this step, glue is applied to the outside of the front and back of the book block. The book block is placed inside the cover and aligned so that the cover overhangs the block evenly at the top, bottom and front. Then the book is placed under pressure until the adhesive sets.
PraLeg Casing-in Machine by Schmedt
While it is possible to do the casing-in step by hand, and many small book and album companies do, most book plants use some type of automated machinery. The semi automated PraLeg by Schmedt is a good machine to discuss because it is easy to see and understand its operation.
First, the book block is placed over the wing that sticks out at the top of machine. The machines lowers the book into glue area and the cover is placed face up on top of the machine. Then the machine raises the book block through rollers that apply the glue and lifts the block into the cover.
PraForm by Schmedt
Once the cover is attached, the assembled book needs to be pressed and the hinge needs to be formed. The picture at the right shows a book ready to be pressed in a Schmedt PraForm.
The video below shows these steps much more clearly than I can describe them.
The Schmedt machines are used in a wide variety of moderate volume book companies. Muller Martini and other companies make bigger, faster and more automated machines, but internally their function is very similar to the PraLeg.
I spend a lot of time reading and most of it is on the screen of my computer, iPad or phone. But when I am strongly interested in the visual content of a book, I insist on a hard cover book, preferable layflat or Smyth bound. It is far easier and more enjoyable to explore photography, art and architecture in a real book.
In the printing industry, the term for the cover of a book is the case and most cases are made in the same way. Cardboard reinforcements, slightly larger than the book block, are cut for the front, back and spine of the book. They are glued to the back of the cover material which is then wrapped around the edges of the cardboard and tucked in at the corners.
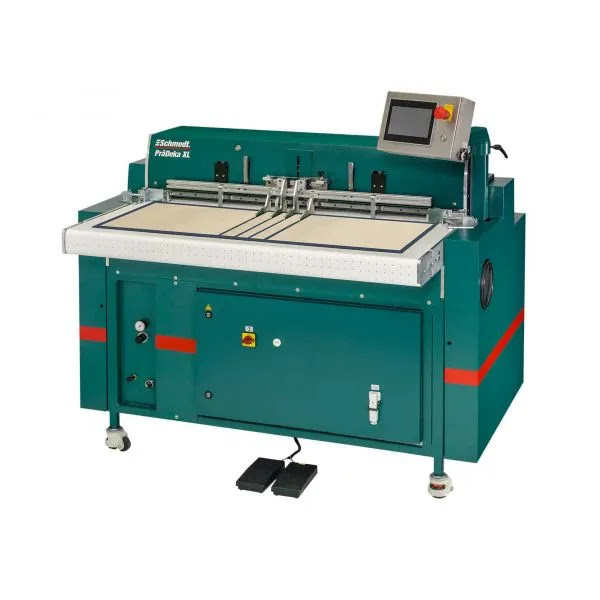
The PraDeka XL from Schmedt is a semi-automated case making machine that works well for moderate volume personalized book manufacturing. As you can see in the picture at the right, the cover, with adhesive on the back, is placed face down on the machines vacuum table and the cardboard is place within the alignment guides. Pressing a footswitch pulls the cover into the turning section which wraps the top and bottom edges. After tucking in the corners by hand, the operator turns the book 90 degrees and presses the footswitch again to wrap the left and right edges.
This is easier to demonstrate than to explain and the video below from Schmedt's YouTube channel is very easy to understand.
While Schmedt builds a range of different equipment for bookmaking, higher volume book binding companies use more automated machines supplied by GP2, Kolbus, and Muller Martini.
The first thing you see when you pick up a book is the cover. However, it is the inside of the book, the book block, which has a far greater impact on the overall functionality of the book. In this post, we are going to cover three book block construction methods and their advantages and disadvantages.
Layflat binding is a premium quality technique which is used for books with a strong visual impact. The most common applications are photo books, children's books and sales collateral for high end real estate and yachts. A layflat book consists of series of panoramic two-page spreads without any gutter or break in the center.
Image from Imaging Solutions AG
The two images above show the contrast between a perfect bound book where the image is interrupted by the gutter at the center and the layflat book at the bottom where the image can stretch seamlessly across the center.
Layflat books are manufactured by printing each two page spread, leaving the back of each printed sheet blank. The printed sheets are creased and folded at the center then glued together back-to-back or with a cardboard sheet sandwiched between to create thicker pages.
fastBook Professional by Imaging Solutions AG
Most personalized layflat books are made using equipment from Imaging Solutions AG in Switzerland. The fastBlock and fastBook Professional take the printed and collated sheets and do the creasing, folding and gluing to create a book block ready for trimming.
While layflat books have strong visual impact and are extremely durable, they require twice as much paper as other types of books and the binding process is slower because each page is glued individually. They are too expensive for most mainstream book projects.
Smyth Sewing Produces Durable Books for Libraries
Most library books and textbooks are bound using Smyth Sewing. A Smyth sewn book is manufactured by printing the content on both sides of a large sheet. These sheets are folded to create signatures consisting of multiple pages, often 16 or 24 pages per signature. Each signature is sewn with thread through multiple places along the spine of the book. Then all of the signatures are sewn together to create the complete book block.
Smyth Machinery USA Provides equipment for Smyth Sewing
Automated equipment for building Smyth sewn books was first patented by David McConnell Smyth in 1871 and the company which bears his name is still one of the leading suppliers of Smyth sewing equipment. Because the threads go through every page, these books are durable and hold up well to heavy use. However, the process works best for large runs of books and is seldom used for personalized book projects.
The most popular from of book binding is perfect binding which is used for almost all paperback books and many inexpensive hard cover books. In a perfect bound book, the pages are printed on both sides and trimmed to a single page size. The pages are collated together and the spinal edge is roughed up with blades or abrasives. Next an EVA (Ethylene Vinyl Acetate) hotmelt glue is applied to the spine and the spine of the book block is pressed into the spine of the soft cover. As the glue cools, it holds the pages together and holds the cover to the book block.
If the perfect bound block is to be used in a hardback book, stronger end papers are added at the front and back of the book before it is glued. These will be used to attach the book block to the cover.
Perfect bound books are popular because they are lightweight and inexpensive to make. However, the glue in the spines keeps the books from opening flat. If the books are forced open, the spine can be broken and the pages can fall out. Heavy use can also cause the spines to give way and allow the pages to fall out. While this binding method is often used for personalized books, the books lack the durability and the visual impact of layflat books.
There is a variation of perfect binding called PUR binding. With PUR, the EVA hotmelt adhesive is replaced with a Polyurethane Reactive adhesive. This is stronger and makes the pages less likely to fall out, but it also requires several hours of curing time before the book can be trimmed. This makes it less attractive for manufacturing personalized books.
Whichever of these binding methods are used, the final book block must be trimmed on the top, bottom and front edge before it can be cased in.
Most of us who love to read books take the actual physical embodiment of the book for granted. We assume that it will be light enough and durable enough to carry, and able to be opened and closed hundreds of times without falling apart. In reality, a well made book is a mechanical marvel that requires each of the components to be precisely sized and positioned.
Since most people have never made a book, I am planning to put together several posts on the materials and processes required to make a high quality book. To begin, take a look at the diagram above and let's discuss the most important pieces.
Hard cover books are assembled in two sections. The inside pages are bound together to form the book block and the edge where the pages are bound together is the spine. At the front and back of book block, end papers or end sheets are bound with the book block. The end papers are usually thicker and stronger than the rest of the pages and will be used to adhere the block to the cover.
The cover, or case, is made by wrapping cloth, leather or a laminated print around stiffening material, usually chipboard, There is a stiffening board for the front, one for the back and usually one for the spine. The spine board is the width of the thickness of the book block and there is a gap of a few millimeters between the spine board and the front and back boards to create the hinge that allows the book book to open. The wrapping material is glued to the boards, wrapped around the boards and turned in so the edges will not be visible when the cover is attached to the book,
Once the book block and case are completed they need to be brought together. This is done by applying an adhesive to the front and back end papers then positioning the case around the block so that the spacing at the fore edge, top edge and bottom edge are the same. One the books are assembled, they are usually put under pressure to ensure a good attachment when the glue dries or cures.
Headbands are often added at the top and bottom of the spine to provide a decorative touch.