Showing posts with label 3D Photography. Show all posts

Thursday, June 14, 2012

Don't Break the Window

Stereo 3D photography requires a different approach to composition and framing than traditional two dimensional photography. Generally, the best subjects are those that have natural depth that will be highlighted by the stereo effect. However, the 3D photographer must always be aware of the stereo window and take care not to break the stereo window.

When you look at a two dimensional image, you are looking at the scene. With a 3D image, you are looking into the scene as if you were looking through a window. The edges of the image form the boundaries of that stereo window. Just like a real window, there can be things to see through the window and there can be things to see in front of the window. But if there is something at the left or right edges that projects forward, the stereo window is violated and the stereo effect no longer works.

This 3D image of an Orchid has a severe window violation.
In the stereo pair it is easier to see how the green bud on the right breaks the stereo window.
These images of orchids from the St. Paul Winter Carnival are examples of severe window violations. The green bud on the right is placed significantly in front of the viewing window but violates the window by projecting beyond the right edge. There is a significant difference between the left and right views at that edge which is confusing to the eyes and prevents a good 3D effect. There is also a window violation on the left with the yellow flower.

This 3D image of an orchid has good depth and no window violations.
In the stereo pair, you can see that no part of the orchid crosses the stereo window.
You can avoid window violations by framing scenes to keep anything that is closer than your primary subject away from the left and right edges of the image. Generally, this means shooting scenes at a wider angle than you might for a 2D image. The second set of orchid images show good 3D depth without any window violations.

Have you tried capturing any 3D images yet?  If so, please share the links.


Thursday, June 7, 2012

Stereo Photo Maker

Stereo Photo Maker displaying picture of Molly Brown's home.
Last week, I covered methods to capture Stereo 3D images. Once you begin creating your own 3D images, you will need Stereo Photo Maker. Stereo Photo Maker is part of a suite of free software that has been developed by Masuji Suto for viewing and editing stereo images. There are versions available for Windows and Mac OS.

The software is very helpful for viewing 3D images because it can open all of the standard 3D file formats and display images using all of the common 3D methods. All of the 3D images that I have featured in this blog were saved by my camera as .mpo files then opened in Stereo Photo Maker to be converted and saved as stereo pairs and stereo anaglyphs.

If you are capturing pairs of images using the cha cha method, Stereo Photo Maker can be used to align your separate images into a single 3D image. You can adjust the relative sizing of the images, vertical and horizontal alignment, and rotation manually, or you can allow the software to align the images automatically.

Stereo Photo Maker is particularly useful for cropping which would be quite difficult otherwise because the crop has to be applied equally to the left and right image views. I find it helpful to capture most scenes zoomed out slightly then crop down to the best composition in the software.

Next week we will cover the stereo window and composing to avoid window violations.


Thursday, May 31, 2012

Photography in 3D

Roof of the Walt Disney Theater
A couple of weeks ago, I uploaded posts on the basics of stereoscopic 3D imaging and ways to view 3D content. 
  
While watching 3D movies, and viewing 3D pictures on the web can be enjoyable, it’s even more fun to create your own 3D content. Here are three ways you can create 3D photos yourself.


The simplest way to capture 3D is using a 3D camera which has two separate lenses and two separate image sensors. I use a Fuji Finepix Real 3D W1 which is as easy to use as any standard point and shoot camera. Because the two lenses zoom synchronously, I am able to compose scenes and capture them without any concern about alignment between the left and right frames. The Finepix can save each image as a .mpo file which is a popular 3D image format or as a 2D .jpg file. Both the left and right frames are captured at 10 megapixels.

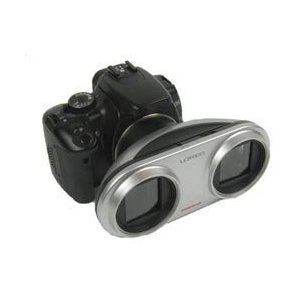
If you prefer to use your DSLR camara, you can convert it to 3D by using the Loreo Lens in a Cap. The Lens in a Cap uses two lenses, 90mm apart, to capture a left and right view side by side on a single frame. Images captured with the Loreo Lens in a Cap can be printed and viewed using the Loreo Pixi viewer without any additional image processing. In my experience, the Lens in a Cap worked perfectly when I could position the camera at the right distance from the subject. Too often, the fixed focal length on the lens made it difficult to compose the image the way I wanted.

You can also capture a stereoscopic 3D image with a standard 2D camera and lens using a method called “cha-cha.” To cha-cha you stand with both feet together and frame your scene in the viewfinder and capture the left image. Then you slide your right foot about 90 mm to the right, slide your left foot next to your right and capture the right image.  You need to do this dance without moving the camera up or down or rotating it in any way. If you successfully captured the images in alignment, you should be able to print each of them side by side and view them in stereo using a Loreo Pixi viewer.

Why not give it a try?


Fuji FinePix Real 3D W1
Loreo Lens in a Cap


Thursday, May 10, 2012

How to View Stereo 3D Content


Stereoscopic 3D imaging provides depth to pictures by simulating the different views seen by each eye. While the concept is as old as photography, it has gained an unprecedented amount of support in the last two years from the entertainment and consumer electronics industry. A growing number of major movies are being filmed in 3D, major video games are being released in 3D, all major TV and monitor manufacturers are making 3D TVs and Nintendo has released a 3D version of their hand held game console. All of these are potential viewing devices for 3D images.

All stereoscopic 3D images, whether still or video, consist of two separate views in which elements are positioned differently depending on how deep they are in the scene. Viewing a stereoscopic 3D image requires a method to allow each eye to see only one of the two images. Here are the most common methods for viewing stereoscopic content:

Parallel View – Parallel view consists of placing the left and right images side-by-side on a monitor or printed card. While some users are able to fuse the two images into a single 3D image on their own, most require a viewer to help focus each eye on the correct image. One of the simplest and most effective is the Loreo Pixi viewer which consists of two prisms mounted in a folding cardboard glasses frame. Using the Loreo viewer,  any computer monitor can be used to display 3D content.

The Loreo Pixi 3D Viewer
Red/Cyan Anaglyph – An anaglyph image applies a red cast to one view and a cyan cast to the other. Glasses with red and cyan lenses filter the views for each eye. This is one of the easiest and cheapest methods because the images can be displayed on any device and cardboard red/cyan glasses can be purchased in bulk for about $.50. However, the quality is poor. The method distorts the color of the image and there is frequently ghosting because the filters in the glasses do not match the display color. 

Anaglyph image of a bird in flight.
Passive Sequenced – The 3D movies currently shown at theaters use the passive sequenced method where the left and right images are projected one at a time in rapid sequence through filters polarized at opposing angles. The viewer wears glasses with polarized lenses to filter the images to each eye. This viewing method is also used with some consumer level 3D projectors.

Passive Interlaced – The passive interlaced method requires building the polarized filters into a TV monitor in strips. The right and left images are interlaced into the strips and the viewer wears polarized glasses to filter the images to each eye. This method is being used by some high end 3D TVs, but it adds significant cost to the production of the TV. As the costs come down, this may become the preferred technology for 3D in the living room because the glasses are inexpensive and do not require charging.

Toshiba Laptop with Active Shutter Glasses
Active Shutter Sequenced – Most of the 3D TVs that are in the stores currently use the active shutter sequenced method. The right and left images are shown in rapid sequence and the user wears a pair of glasses with LCD shutters which turn on and off in sync with the screen refresh on the TV monitor. This is the least expensive technology right now for the home because it does not require significant changes or additional costs for the monitor. The disadvantage, particularly in households with children, is the need for keeping the batteries in the glasses charged and the replacement costs if the glasses get lost or broken.
The Nintendo 3DS uses a parallax barrier to show 3D content.

Parallax Barrier – The Nintendo 3DS hand held gaming console, the display on the Fuji 3D camera and a number of recently announced 3D laptop computers have parallax barrier screens. With this method, the left and right images are interlaced onto an LCD screen. A second LCD screen layer creates a series of lines which keep each eye from seeing the images intended for the other eye. This approach is autostereoscopic which means that it works without any type of 3D glasses. However, the user has to be at a particular distance from the screen and at a particular angle to experience the 3D effect which limits its application to small, single-user devices.

Lenticular – Lenticular printing is not really a stereoscopic display method but instead mimics the effect of stereoscopic viewing. For lenticular printing, typically 12 to 24 images are interlaced into a single print which is laminated onto a special lens to allow the viewer to see different views as the image is rotated. To create a lenticular print from the left and right views of a stereoscopic 3D image, special software must be used to create the intermediate views.

Although there are many ways to view 3D content, I usually post images as a 3D stereo pair and a red/cyan anaglyph. This makes them accessible to readers with the least expensive viewing tools. 

How do you prefer to watch 3D content?


Thursday, May 3, 2012

Stereoscopic 3D Basics

Replica of traditional stereo viewer from 3D Concepts
I enjoy taking 3D pictures and watching 3D movies. There have been several posts here which either comment on 3D content or include 3D images. In this post, I would like to explain the basic concepts behind 3D photography and 3D cinematography.

Each of us have two eyes approximately 6 centimeters apart. When both eyes are functioning properly, we see two slightly different scenes in each eye. Our mind combines those scenes and uses the difference between them to determine depth.  

To see how this works, slide back until you are about three feet from your computer screen and hold one finger up about halfway between your face and the screen. Now close one eye and note which words are still visible. Now open your eye, close the other and note which words are visible. At short distances, the difference between the scenes captured by each eye is quite significant.

As our minds process the differences between the two scenes, there are two pieces of information that are used to determine depth.  The first, horizontal parallax, is the difference between the relative positions of items in the two scenes. In our example, we know the finger is closer than the screen because it moves right and left on the screen as we switch from eye to eye.


Note the differences in which people are visible in the backgrounds of the two frames of this stereoscopic 3D image of street performers at Santa Monica pier. The difference in who is hidden is called occlusion revelation. The difference in the relative positions of the tourists is the horizontal parallax.

The second clue to depth is called occlusion revelation. This refers to the small areas of a scene that are occluded or hidden from one eye but revealed to the other. The perception of those small areas and the width of those occluded areas are a major input in our brain’s calculation of depth.

When we view a traditional 2D photography or movie, we can still recognize the depth of the scene through several monoscopic cues. We can make depth judgements based on perspective, the relative size of objects, changes in texture gradients and position relative to the horizon. Occlusion is also the most important monoscopic depth cue because any object that hides must be in front of what is hidden.

3D photography increases the level of realism by adding back in the stereoscopic depth cues. This is done by showing each eye its own unique view of the scene. Stereoscopic 3D requires a way to capture or create the scene with separate right and left eye views and a way to present each of two those views to the appropriate eye. I will explore those methods in future posts.


The stereoscopic 3D image above was captured with this Loreo 3D lens adapter which uses two focusing lenses to project two separate image views onto one camera frame.

What is your favorite 3D movie so far?


Wednesday, August 24, 2011

Cellphone Array Camera

Question:  What is the best camera for taking a picture?

Answer: The one you have with you!

 Since most of us carry our cellphone with us all the time, cellphone cameras have been quickly overtaking other imaging devices. Infotrends reports that 42% of people with a camera phone use it as their primary camera.

Although the resolution of camera phones has been steadily increasing, they have remained limited in their ability to capture pictures in low light situations or zoom in well on distant subjects.  These capabilities required large lenses which don't fit into a camera phone. This is about to change.

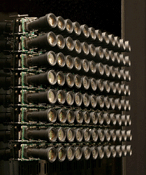
Mountain View, California based Pelican Imaging Corporation has built a prototype of an array of 25 cameras that can easily fit into a smartphone. With 25 imaging sensors, far more light can be captured, greatly improving the performance in low light conditions. The data from all the individual sensors can be combined to compute an image far sharper and with a greater dynamic range than any single sensor could produce.

A large array of cameras for research at Stanford University
Since the images are being captured from different angles, it would also be easy to compute a pair of stereo 3D images or a set of multiple views for lenticular 3D prints. 

The limitations of  the current camera phones are part of the reason why serious photography enthusiasts still buy digital single lens reflex cameras, micro four thirds systems and other high end image capture tools. These limitations also help preserve the market for professional photography by preventing the average camera phone user from capturing a great image.

The reduction of quality differences between consumer cameras and professional cameras have been already changed the professional photography market significantly. The introduction of array cameras on cellphones will accelerate that trend.

What is your favorite image capture device?


Wednesday, July 20, 2011

Rockies in 3D

Missouri has been too hot to be comfortable this week so we threw our hiking boots and cameras in the car, put the top down and headed for Colorado. The scenery in the mountains is always beautiful with great depth and this year we have been particularly fortunate to see several of the wild animals in the park.

Most of these pictures were taken in the Rocky Mountain National Park, but the ones featuring the Royal Gorge Scenic Railway were taken in Canon City.  Each has been upload as a stereo pair and a red/cyan anaglyph so you can view them with the method you prefer.

North Inlet

North Inlet

Momma Moose

Momma Moose

Momma Moose & Calf

Momma Moose & Calf

Draft Horses in the Meadow

Draft Horses in the Meadow

Terri and the Arkansas River

Terri and the Arkansas River

Terri on the Train

Terri on the Train

Mom and Chick

Mom and Chick

Tundra Flower

Tundra Flower

Rockies Majesty

Rockies Majesty


Where are you vacationing this summer?

Wednesday, July 6, 2011

Camera Glasses

Acts of creation require perception.  They also change our perception.

Photography is one of my creative hobbies. When I take vacations or go on weekend trips, I like to take a 3D camera and capture images that are attractive and artistic.  The pictures from our trips to St. Paul, Minnesota and Washington DC have been posted on this site earlier this year.

When I have a camera in my hands, I see the world differently.  It’s like putting on a pair of glasses that make everything seem sharper and more vibrant. The camera transforms me from a passive observer to an active participant in the beautiful world that surrounds me. I can see how the tree in the foreground frames the tugboat on the river and how the railway bridge in the background provides context.

The transformation is mostly unconscious. The individual books, articles I have read on composition and lighting are forgotten in the moment of creation, but they influence my creative choices. Experience makes the camera feel comfortable in my hands and allows me to capture the moment effortlessly. Photography becomes a flow experience that freezes time and creates an image to preserve and share.

What art form do you practice?  How does it change your perception of the world?

The Stephenson II on the Missouri River at Glasgow